
Optimizing Performance in React Applications
Improve Your React App's Speed: Best Practices for Performance Optimization


Introduction
Imagine this scenario: you visit a website, eager to explore its content, but the page takes forever to load, leaving you frustrated until you decide to abandon it. This situation highlights the importance of optimal web performance.
Users expect web applications to load fast and respond swiftly to their actions. A smoothly running website improves user satisfaction and positively impacts search engine rankings. On the other hand, slow-loading websites and unresponsive interfaces can lead to user frustration, high bounce rates, and loss of potential customers and revenue.
With React, you usually get a fast and performant UI by default. However, as the app's complexity grows, using several techniques to maintain optimal performance becomes essential.
This article will cover those techniques. From learning how to identify performance issues to mitigating them through methods like code-splitting and lazy loading, this guide will equip you with the tools and knowledge you need to make your React apps perform at their best.
Prerequisites
You should be familiar with the following technologies to follow along this guide:
Basic understanding of React
HTML, CSS, and JavaScript knowledge
Understanding Web Performance Metrics
Performance optimization isn't just a matter of perception; it's grounded in data-driven metrics that quantify the user experience. Before diving into optimizing React apps, let's first understand some key web performance metrics.
Time to Interactive (TTI)
Time to Interactive measures the time it takes for a web page to become fully interactive, meaning users can interact with the page elements, click buttons, and navigate without experiencing delays.
Why it matters: An interactive page provides a smoother user experience, and a faster TTI is associated with higher user engagement.
First Contentful Paint (FCP)

The First Contentful Paint tracks the time it takes for the first visual element of a web page to be displayed in the user's viewport. This visual element could be text, an image, or any visible content.
Why it matters: FCP is crucial for perceived performance. Users feel a sense of progress when they see something on the screen, even if the page has yet to load fully.
Speed Index
Speed Index measures how quickly the contents of a web page are visibly populated. It quantifies the visual progression of the page load, providing insights into how users perceive the loading speed.
Why it matters: A lower Speed Index indicates a faster-loading experience, contributing to positive user perceptions and engagement.
Largest Contentful Paint (LCP)
The Largest Contentful Paint measures the render time of the largest content element visible within the viewport, whether an image, video, or large text block.
Why it matters: LCP directly correlates with a user's perceived loading speed. A fast LCP ensures that users see meaningful content quickly, enhancing their overall experience.
Total Blocking Time (TBT)
Total Blocking Time measures the time the browser's main thread is blocked and unresponsive to user input. It's linked to script execution and can impact interactivity.
Why it matters: High TBT can result in sluggish interactions, making the website feel unresponsive.
Cumulative Layout Shift (CLS)
Cumulative Layout Shift quantifies the visual stability of a web page. It measures unexpected layout shifts that occur as content loads. An unexpected shift happens when elements on the page move unexpectedly, causing user frustration.
Why it matters: A low CLS score ensures that elements don't unexpectedly move around, which can be frustrating on mobile devices.
Initial Performance Assessment
Now that we've familiarized ourselves with some key web performance metrics let's learn how to assess the state of our web applications.
Before you can optimize, you first need to establish a baseline performance measurement. This will serve as a starting point for improvement and help track your progress as you optimize. You can use assessment tools such as Lighthouse, WebPageTest, and React Developer Tools (React DevTools) to do this.
Use the Production Build
When measuring performance or identifying performance issues in your React apps, ensure you're testing with the production build. The development build is usually larger and slower than the minified production version, so it doesn't accurately represent how the application performs when it's live.
The only exception to using the production version would be when using React DevTools, which requires the development build to run.
Using Lighthouse
Lighthouse is an open-source tool developed by Google that audits web pages for performance, accessibility, best practices, and more. It gives a detailed report on these website attributes with suggestions on improving any issues it finds.
To run a Lighthouse audit:

Open DevTools: Right-click on the target website in your browser and select "Inspect" to open the DevTools panel.
Go to the "Lighthouse" tab: Within DevTools, navigate to the "Lighthouse" tab.
Configure Audits: Customize your audit by selecting the desired categories (Performance, Accessibility, Best Practices, SEO) and device emulation settings.
Run the Audit: Click the "Analyze page load" button to initiate the audit.
Review the Results: Review the Lighthouse report once the audit is complete. Pay special attention to the performance section, which will provide insights into areas that need improvement.
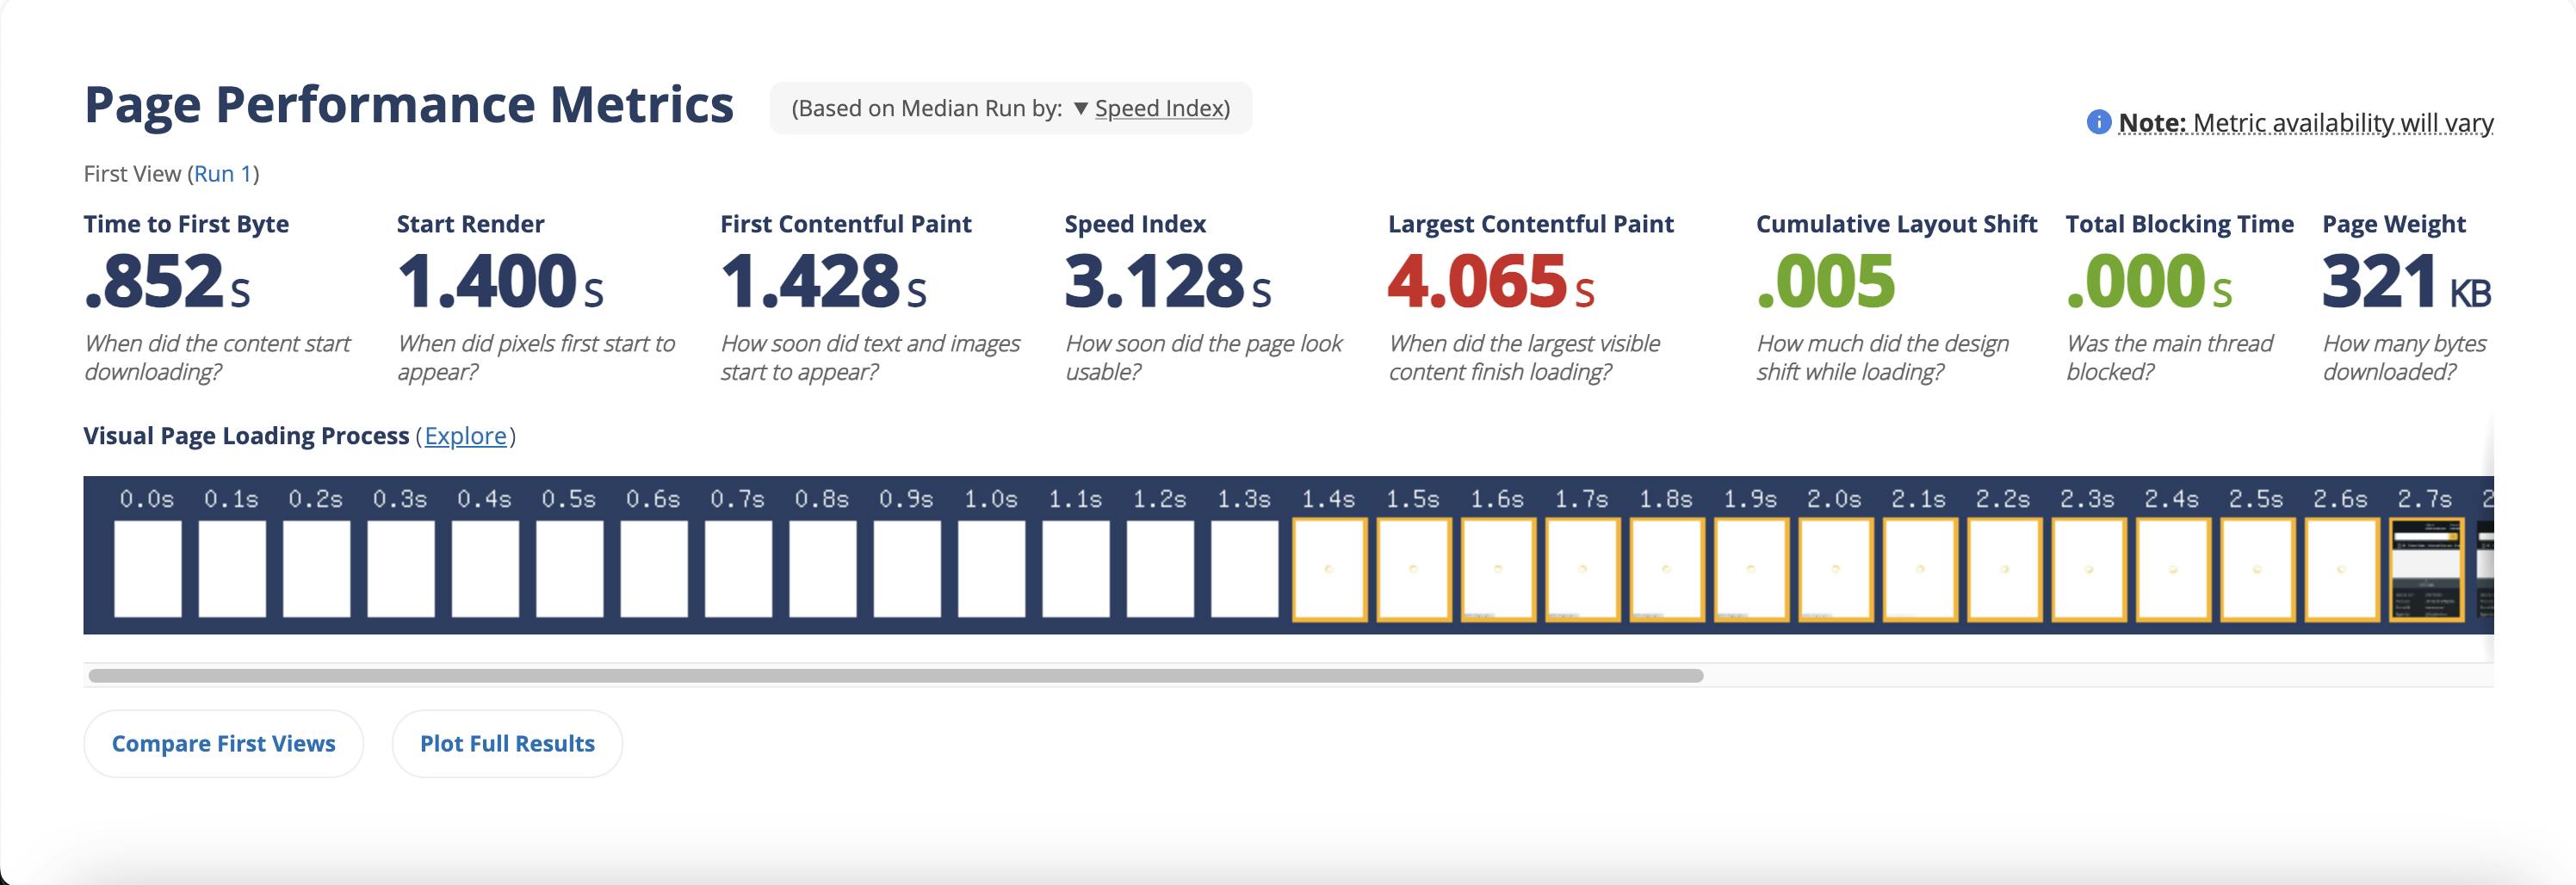
Using WebPageTest
WebPageTest is another powerful tool for evaluating web page performance. It allows you to simulate page loads on different devices and network conditions.
To perform a test with WebPageTest:

Visit WebPageTest: Go to WebPageTest.org.
Enter Your Website URL: In the input field, enter the URL of your website.
Choose Test Location: Select a location that is geographically relevant to your target audience.
Select Browser and Connection: Choose the browser (e.g., Chrome, Firefox) and connection speed (e.g., Cable, 3G) for the test.
Start Test: Click the "Start Test" button to initiate the performance assessment.
Review Results: After the test is complete, you'll receive a detailed performance report that includes metrics like page load time, FCP, and more.
Using React DevTools
Unlike the other general-purpose assessment tools we've looked at, React DevTools is crafted specifically for React applications. Think of this tool as a microscope for your React components, allowing you to inspect, profile, and debug your application's React tree. Here's how you can utilize it to assess your app's performance:
Installation:
Install React Devtools as a browser extension. It's available for browsers like Chrome, Firefox, and Edge.Profiling Performance:

Initiate Profiling: Click on the "Profiler" tab in React DevTools. Start profiling your application by clicking the "Record" button. This action captures performance data while interacting with your website.
Interact with the application: Perform typical interactions on your website, such as navigating pages, clicking buttons, scrolling through content, etc.
Stop Profiling: After interacting with your site, click the "Record" button again to end the profiling session.
Analyzing Components:
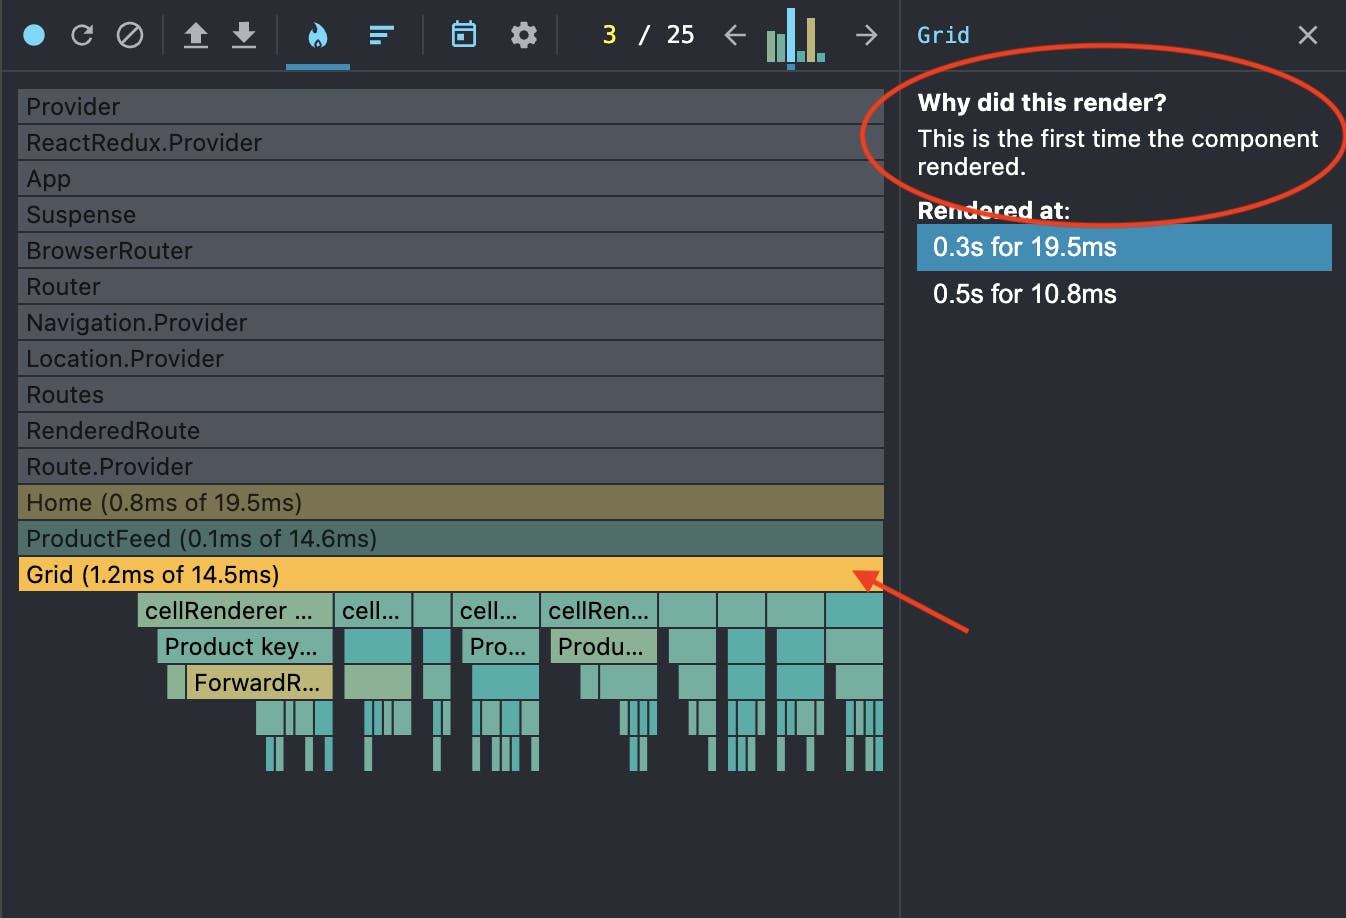
View Render Times: In the Profiler tab, you can see detailed information about component render times. Identify components with long render durations, as these are potential areas for optimization.
Identify Re-renders: Click the "Settings" button in the Profiler tab and navigate to the Profiler section. Check the option "Record why each component rendered while profiling." Enabling this feature allows React DevTools to provide information on why each component was rendered, allowing you to identify unnecessary renders. Understanding which components re-render unnecessarily and why they do can help you know where to optimize performance in the component.
Using React DevTools provides a visual understanding of your React components' behavior and performance. Combined with data from Lighthouse and WebPageTest, you'll have a comprehensive overview of your react app's current state.
Optimization Strategies
Now that we've learned how to identify performance issues in React apps, let's explore some strategies and techniques for optimizing them.
DOM size optimization
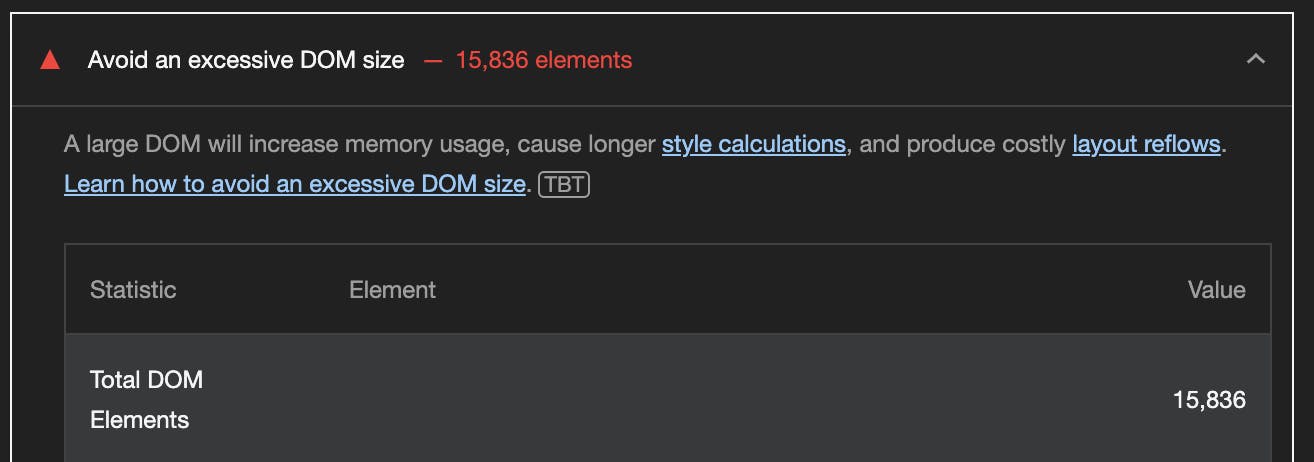
The Document Object Model (DOM) represents the structure of a web page, and the size of this structure directly impacts a React application's performance. Large and complex DOM trees can slow down rendering and increase memory usage.
Let's explore some techniques that can be used to optimize the DOM.
Avoid complex nesting
Every DOM element adds to the rendering cost. Minimize unnecessary elements and consider grouping related elements into containers, and when no container node is needed, use a <Fragment> (usually used via <>...</> syntax) to group them.
Utilize semantic HTML to convey the structure effectively while keeping the DOM hierarchy shallow. For example, instead of multiple nested div elements, use semantic tags like <header>, <main>, <section>, and <footer>:
// COMPLEX NESTING ❌
<div className="container">
  <div className="content">
    <div>
      Content
    </div>
  </div>
</div>

// SIMPLIFIED STRUCTURE ✅
<main className="container">
  <section className="content">Content</div>
</div>
Windowing/List virtualization
Windowing or list virtualization is a technique used to optimize the rendering of long lists by rendering only the items currently visible in the user's viewport. This helps minimize the number of DOM nodes created when rendering repeated elements on a page.
You can implement windowing in your React app by utilizing libraries like react-window or react-virtualized. For example, with react-window, you get several components, such as FixedSizeList and VariableSizeList, which optimizes the rendering of large lists by recycling DOM elements as the user scrolls:
import { VariableSizeList as List } from 'react-window';

const data = [...]; // Your list of data

const RowRenderer = ({ index, style }) => {
  return <div style={style}>{data[index]}</div>;
};

const VirtualizedList = () => {
  return (
    <List
      height={500}
      itemCount={data.length}
      itemSize={(index) => 50} // Row height
      width={300}
    >
      {RowRenderer}
    </List>
  );
};
React apps can efficiently handle large datasets by employing windowing and list virtualization techniques, ensuring a responsive user interface even when dealing with large amounts of dynamic content.
Memoization
React uses a powerful optimization technique called memoization to prevent unnecessary component renders. It works by storing the results of computations in a cache and retrieving the same information from the cache the next time it is required, rather than computing it again.
React provides three main techniques for memoization: memo, useCallback, and useMemo. Let's explore these methods and understand how they can be implemented effectively.
memo
memo can be used to memoize components by preventing unnecessary re-renders when their props remain unchanged.
For example, let's say you have a UserList component responsible for rendering a large list of users based on the users prop:
const UserList = ({ users }) => {
  const sortedUsers = users.sort((a, b) => a.name.localeCompare(b.name));

  return (
    <ul>
      {sortedUsers.map(user => (
        <li key={user.id}>{user.name} - {user.email}</li>
      ))}
    </ul>
  );
};

export default UserList;
The UserList component sorts the users by their names before rendering the list. However, sorting operations can be computationally expensive, especially when dealing with many items.
So, to make sure this expensive re-rendering logic only runs when the users prop changes you can apply memo to the component:
import { memo } from 'react';

const UserList = memo(({ users }) => {
  const sortedUsers = users.sort((a, b) => a.name.localeCompare(b.name));

  return (
    <ul>
      {sortedUsers.map(user => (
        <li key={user.id}>{user.name} - {user.email}</li>
      ))}
    </ul>
  );
});

export default UserList;
This optimization can significantly improve the performance of your application, especially when dealing with dynamic data and frequent updates.
useMemo
The useMemo hook memoizes the result of a computation. It accepts a function and an array of dependencies and returns the memoized value. This is useful for optimizing expensive calculations or data transformations.
Consider a scenario where a data visualization component renders a chart based on a large dataset retrieved from an API. The data processing required for this visualization involves complex calculations, such as aggregations, filtering, and sorting.
import { useMemo } from 'react';

const Visualization = ({ data }) => {
  // Expensive data processing logic (e.g., aggregations, filtering, sorting)
  const processedData = useMemo(() => {
    // Perform complex calculations on the data
    // ...
    return processedResult;
  }, [data]);

  // Render chart using processedData
  return <Chart chartData={processedData} />;
};

export default Visualization;
In this example, the useMemo hook memoizes the processedData variable. The expensive data processing logic inside the useMemo callback function ensures that the computations only run when the data prop changes.
useCallback
The useCallback hook lets you cache a function, preventing unnecessary re-creations of the function definition. This hook can be useful when passing callbacks to child components, ensuring they do not re-render unnecessarily.
For example, say you have a Dashboard component you're trying to optimize:
const Dashboard = ({ month, income, theme }) => {
  const [data, setData] = useState([]);

  useEffect(() => {
    // Fetch data
    // ...
  }, []);

  const onFilterChange = (filter) => {
    // Handle expensive filter change logic
    // ...
    setData(result);
  }

  return (
    <div className={`dashboard ${theme}`}>
      <Chart data={data} onFilterChange={onFilterChange} />
      {/* Other components */}
    </div>
  );
};
After using React DevTools, you figured out that the Chart component within the dashboard is re-rendering unnecessarily whenever you change the dashboard's theme. So, you decide to apply memo to the component:
const Chart = memo(({ data, onFilterChange }) => {
  // ...
});
However, even after applying memo, you notice it still re-renders unnecessarily. After more digging, you find the onFilterChange function is the culprit. The Dashboard component recreates the function with each render, so it still causes re-renders in the Chart component.
To address the issue, you can introduce a useCallback hook to the function:
const Dashboard = ({ month, income, theme }) => {
  const [data, setData] = useState([]);

  useEffect(() => {
    // Fetch data
    // ...
  }, []);

  const onFilterChange = useCallback((filter) => {
    // Handle expensive filter change logic
    // ...
    setData(result);
  }, [month, income]);

  return (
    <div className={`dashboard ${theme}`}>
      <Chart data={data} onFilterChange={onFilterChange} />
      {/* Other components */}
    </div>
  );
};
By wrapping the onFilterChange function with useCallback, you memoize the function instance itself. This means that the function will only be recreated if its dependencies change. In this case, the dependencies are the month and income variables from the Dashboard component's props.
Should you always use memoization?
Using these memorization techniques becomes valuable when your component, function, or value frequently re-renders with identical props or dependencies. This is especially true when its re-rendering logic is resource-intensive.
Utilizing these techniques is generally unnecessary if your component re-renders seamlessly without any noticeable delay. For specific guidelines on when to use memo, useMemo, and useCallback, refer to React's official documentation.
Asset Optimization
Optimizing your website assets is vital for improving website loading speed and getting a better FCP, LCP, and CLS. Large, unoptimized assets can drastically increase page load times and consume unnecessary bandwidth. Let's look at ways to optimize assets in our web apps.
Serving Images and Videos Properly
Here are some best practices to consider when handling images and videos in your projects:
Use the Right Format: Select appropriate image and video formats based on the content. Use JPEG and PNG for raster images and SVG for simple graphics and logos. WebP is a modern, highly compressed image format with excellent quality and smaller file sizes. Consider using WebP for browsers that support it, as it can significantly reduce loading times.
For videos, MP4 is widely supported across browsers, while WebM offers excellent compression and quality.
Compress images and videos: Utilize compression tools or plugins to compress your images and videos before deploying them to production. Tools like ImageOptim or TinyPNG for images and HandBrake or FFmpeg for videos can reduce file sizes without compromising quality.
Replace Animated GIFs with Video: Animated GIFs are large files and can slow down page loading. Consider replacing animated GIFs with video formats (such as MP4) for smoother animations and faster page loads. Videos generally offer better compression and can be auto-played or controlled based on user interactions.
Serve Responsive Images: Use the
srcsetattribute in<img>tags to specify multiple image sources and let the browser choose the most suitable one. Responsive images ensure users receive appropriately sized images, reducing unnecessary data transfer and improving loading speeds, especially on mobile devices.Serve Images and Videos with Correct Dimensions: Specify the exact image and video
widthandheightin your markup to prevent layout shifts during rendering. When the browser knows the dimensions, it can reserve the necessary space, preventing content reflow and improving your website's CLS.
Preloading LCP Image
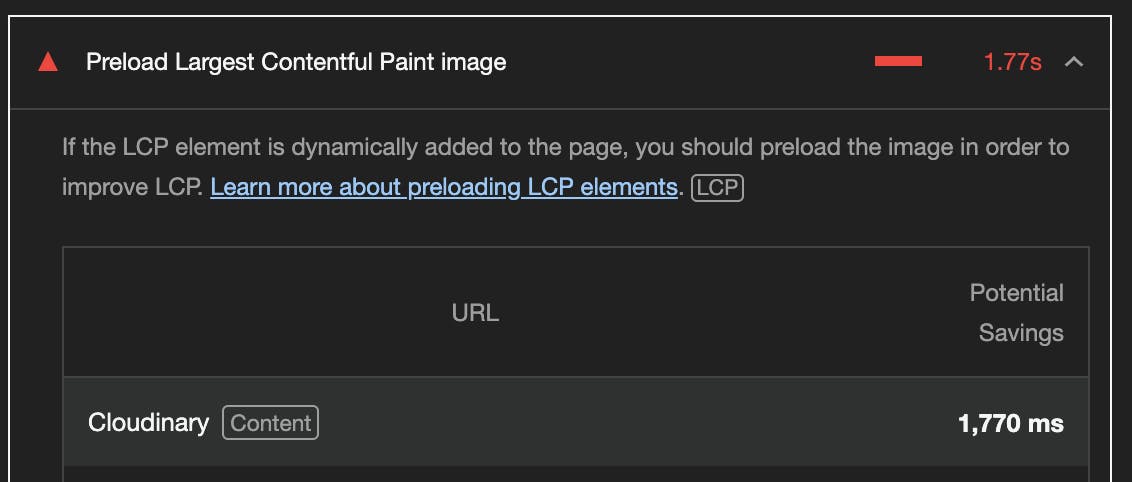
An LCP image is the largest image element on a web page rendered within the user's initial viewport. By preloading this image, you can ensure it is available in the browser cache and ready to be displayed when it enters the user's viewport. This can significantly improve the LCP metric and perceived page loading speed.
To preload an LCP image in React, navigate to the index.html file in the project directory and add the following code:
<!DOCTYPE html>
<html lang="en">
    <head>
        ...
        <link
            rel="preload"
            fetchpriority="high"
            as="image"
            href="/path/to/hero-image.jpg"
        />
    </head>
    ...
</html>
The <link> element with the rel="preload" attribute is used to initiate the preloading process. Here's a breakdown of the attributes used in the <link> element:
rel="preload": Specifies that the browser should preload the resource.fetchpriority="high": Indicates a high priority for fetching the specified resource. This helps the browser prioritize the preloading of this resource over others.as="image": Specifies the type of resource being preloaded, in this case, an image.href="/path/to/hero-image.jpg": Specifies the path to the LCP image file that needs to be preloaded.
Lazy Loading Images
Lazy loading is a technique used to defer the loading of offscreen images until they are needed. This optimization can reduce initial page load times, especially for web pages with multiple images.
React supports lazy loading through the loading attribute in the img tag:
import React from 'react';

const LazyImage = () => {
  return (
    <img
      src="image.jpg"
      alt="Description"
      loading="lazy"
      width="200"
      height="150"
    />
  );
};
This is just a simple way to lazy load images. In more complex scenarios, you might want things like:
An image placeholder during the loading
Effects like blurring during the loading
Setting specific thresholds for loading the image
For these scenarios, you can make use of libraries like react-lazy-load-image-component.
Preconnect to 3rd Party Hosts
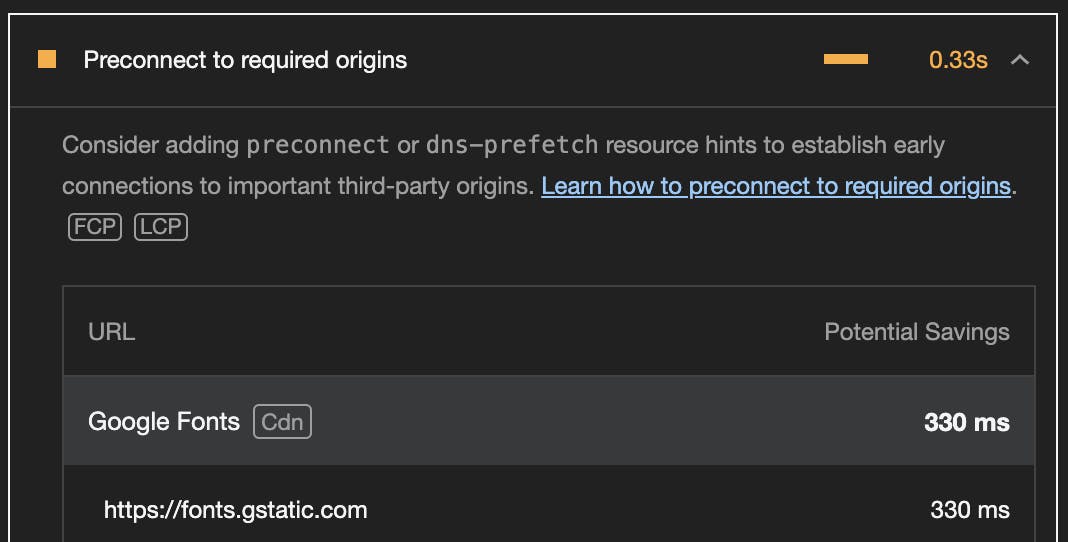
Third-party (3P) hosts are external servers or domains that provide services, assets, or resources a website uses. Examples include social media platforms, content delivery networks (CDNs), and external font services like Google Fonts.
By preconnecting to these 3P hosts, you're instructing the browser to establish early connections to them, reducing the latency when the actual resource requests are made.
Consider a scenario where your React application relies on Google Fonts to style its text. To optimize the loading of the fonts, you can preconnect to their domain. Here’s how you can do it:
<!-- /index.html -->
<!DOCTYPE html>
<html lang="en">
<head>
  <!-- Other head elements -->

  <!-- Preconnect to Google Fonts and link to the stylesheet -->
  <link rel="preconnect" href="https://fonts.googleapis.com">
  <link rel="preconnect" href="https://fonts.gstatic.com" crossorigin>
  <link rel="stylesheet" href="https://fonts.googleapis.com/css2?family=YourFontFamily">

  <!-- Your other stylesheets and scripts go here -->
</head>
<body>
  <!-- React application content -->
</body>
</html>
In the above example:
The
<link>tags with therel="preconnect"attribute establish an early connection to Google Fonts’ domains.The
hrefattribute specifies the domain URL.The
crossoriginattribute is added for security reasons, ensuring the preconnection adheres to the browser's CORS (Cross-Origin Resource Sharing) policies.The last
<link>tag imports the desired font styles into your application.
Using a Content Delivery Network (CDN)

Content Delivery Networks (CDNs) distribute website assets, including images, across multiple servers worldwide. When a user accesses the website, assets are delivered from the nearest server, reducing latency and improving loading times.
By hosting your assets on CDN providers like Cloudinary, CloudFront, CloudFlare, etc, you ensure fast and efficient delivery for visitors across the globe.
Service Workers for Caching Assets and API Responses
Service Workers are scripts that run in the background, intercepting and controlling network requests. They enable the caching of assets and API responses, allowing React apps to function offline and improving load times for subsequent visits.
Implementing service workers in your React app varies depending on the build tool or framework (e.g. Vite, Create React App, Next.js) you use for your app. For example, if your React app uses Vite, you can use workbox-window and vite-pwa to simplify generating and managing a service worker in your app.
Efficient State Management
Efficient state management lies at the core of a well-performing React application. React components re-render whenever their state changes, so managing state properly not only impacts the responsiveness of your application but also affects its memory usage. Let's explore a few ways to efficiently manage complex states in React apps.
Following Best Practices for Managing State
React's official documentation provides a comprehensive guide to managing state. It covers essential concepts such as understanding how to structure state well, lifting state up, and scaling state management as your app grows. By following these best practices, developers can maintain a clear and organized state management system within their applications.
For a detailed guide on managing state in React, you can refer to the official React documentation: Managing State in React.
Context API and useContext
React's Context API provides a great way to share state across components without prop drilling, enhancing the performance of deeply nested components. The useContext hook simplifies consuming this context within functional components.
Let's look at a simple example below:
import React, { useContext } from 'react';

const MyContext = React.createContext();

const ParentComponent = () => {
  const contextValue = 'Hello, Context!';
  return (
    <MyContext.Provider value={contextValue}>
      <ChildComponent />
    </MyContext.Provider>
  );
};

const ChildComponent = () => {
  const contextValue = useContext(MyContext);
  return <div>{contextValue}</div>;
};
By using the Context API and useContext, you can manage shared states efficiently without sacrificing performance, especially in large component trees.
State Management Libraries
For larger applications, state management libraries like Redux and MobX provide tools for managing complex application states, especially states that may update frequently:
Redux: Redux offers a centralized store and follows a unidirectional data flow, making state changes predictable and easier to trace. Actions trigger updates, and components subscribe to the store to receive the latest state.
Let's look at an example using Redux Toolkit:
import { createSlice, configureStore } from '@reduxjs/toolkit' const counterSlice = createSlice({ name: 'counter', initialState: { value: 0 }, reducers: { incremented: state => { // Redux Toolkit allows us to write "mutating" logic in reducers. It // doesn't actually mutate the state because it uses the Immer library, // which detects changes to a "draft state" and produces a brand new // immutable state based off those changes state.value += 1 }, decremented: state => { state.value -= 1 } } }) export const { incremented, decremented } = counterSlice.actions const store = configureStore({ reducer: counterSlice.reducer }) // Can still subscribe to the store store.subscribe(() => console.log(store.getState())) // Still pass action objects to `dispatch`, but they're created for us store.dispatch(incremented()) // {value: 1} store.dispatch(incremented()) // {value: 2} store.dispatch(decremented()) // {value: 1}MobX: MobX allows for more fine-grained reactivity. It tracks dependencies between observed states and automatically updates components when relevant state changes. This can lead to more granular re-renders. Let's look at an example below:
  import { makeObservable, observable, action } from 'mobx';

  class CounterStore {
    count = 0;

    constructor() {
      makeObservable(this, {
        count: observable,
        increment: action,
        decrement: action,
      });
    }

    increment() {
      this.count += 1;
    }

    decrement() {
      this.count -= 1;
    }
  }

  const counterStore = new CounterStore();
Choosing between Redux, MobX, or other libraries depends on your application's needs and your preferences for state management.
You can build responsive and efficient applications by leveraging the right state management techniques, ensuring a smooth app that responds swiftly to state updates in the UI.
Web workers
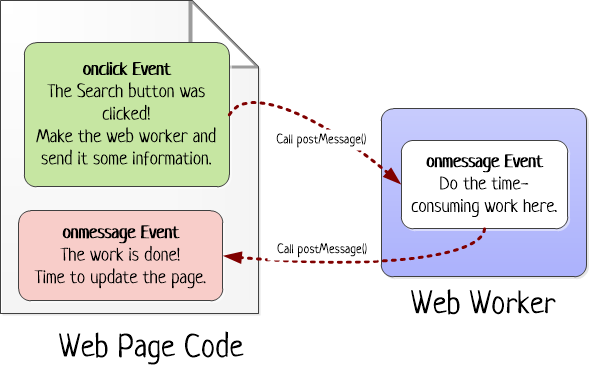
Web Workers allow time-consuming tasks to be executed in the background without affecting the main thread, ensuring a smooth user experience. They are especially useful for tasks like data processing, encryption, or other CPU-intensive operations.
Consider a scenario where you want to calculate the average age from a large dataset without causing UI delays. Here's how you can achieve this using a Web Worker:
// /public/worker.js
self.onmessage = function(event) {
  const data = event.data;

  // Calculate the average age
  const totalAge = data.reduce((sum, record) => sum + record.age, 0);
  const averageAge = totalAge / data.length;

  // Post the result back to the main thread
  self.postMessage(averageAge);
};
In this snippet, we define a Web Worker script (worker.js) that receives data via the onmessage event. It calculates the average age from the received dataset and sends the result back to the main thread using self.postMessage().
Now, let's make use of this web worker in the UI:
// Main component
const WorkerComponent = ({ dataset }) => {
  const [averageAge, setAverageAge] = useState(null);

  useEffect(() => {
    const worker = new Worker('./worker.js');

    // Send the dataset to the Web Worker for processing
    worker.postMessage(dataset);

    // Handle messages from the Web Worker
    worker.onmessage = function(event) {
      const calculatedAverageAge = event.data;
      setAverageAge(calculatedAverageAge);
    };

    // Clean up the worker when the component unmounts
    return () => {
      worker.terminate();
    };
  }, []);

  return (
    <div>
      {averageAge ? (
        <p>Average Age: {averageAge.toFixed(2)}</p>
      ) : (
        <p>Calculating...</p>
      )}
    </div>
  );
};
In the WorkerComponent, we create a new Web Worker using the Worker constructor. The component sends the dataset prop to the Web Worker for processing. When the Web Worker completes the task, it returns the calculated average age and is displayed in the component.
Bundle Size Optimization
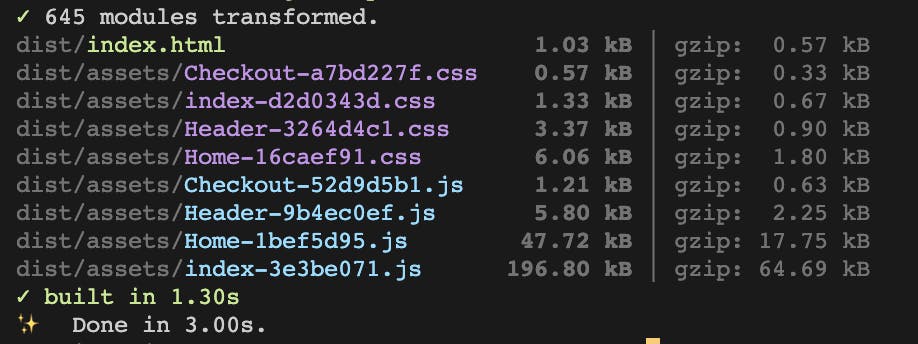
Optimizing your bundle size ensures your application loads quickly, even in adverse network conditions and on various devices. Here are some strategies to optimize React app bundles effectively:
Code splitting
Code splitting is a technique that allows you to split your code into smaller chunks, which are only loaded when needed. This can significantly improve your application's initial loading time and performance, especially for larger projects.
React provides an easy way to implement code splitting using dynamic imports and <Suspense>:
import { lazy, Suspense } from 'react';
import { BrowserRouter as Router, Routes, Route } from "react-router-dom";

const HomeComponent = lazy(() => import('./HomeComponent'));
const AboutComponent = lazy(() => import('./AboutComponent'));

const App = () => {
  return (
    <Router>
      <Suspense fallback={<div>Loading...</div>}>
        <Routes>
          <Route path="/" exact element={HomeComponent} />
          <Route path="/about" element={AboutComponent} />
        </Routes>
      </Suspense>
    </Router>
  );
};

export default App;
In this example, the HomeComponent and AboutComponent are loaded lazily when the user navigates to the respective routes. The loading indicator will be displayed until the components are loaded.
By utilizing code splitting with lazy and <Suspense>, you can significantly optimize your React application's performance, especially for larger projects where reducing the initial bundle size is crucial for faster loading times.
Dependency Audit and Cleanup
Regularly auditing your project's dependencies is essential. Use commands like npm audit or yarn audit to identify vulnerable packages and outdated dependencies. You can also use tools like depcheck to find unused or redundant packages, which you can remove to minimize your application's bundle size:
# Check for vulnerabilities in your project's dependencies
npm audit

# Check for unused dependencies
npx depcheck

# Remove an unused package
npm uninstall package-name
Tree Shaking
Tree shaking is a technique that eliminates unused code from your bundles. With ES6 modules, modern bundlers can analyze your code and remove unused exports, reducing the overall bundle size. To benefit from tree shaking, use ES6 import/export syntax and avoid importing entire libraries if you only need specific functionalities.
// Avoid CommonJS syntax ❌
const React = require('react'); // Not tree-shakable
const Component = React.memo(() => { ... })

// Use ES6 import syntax ✅
import { memo } from 'react'; // Tree-shakable
const Component = memo(() => { ... })
By leveraging these techniques, you can optimize your React application's dependencies and bundle size, leading to faster load times and improved performance.
Rendering patterns
Rendering patterns in React applications play a vital role in shaping how your application is delivered to the client. Common rendering patterns like client-side rendering (CSR) and server-side rendering (SSR) have distinct advantages and use cases. Let's explore these rendering patterns, understand how to implement each, and know when to use them.
Client-Side Rendering (CSR)
In CSR, the initial HTML is minimal, containing just enough JavaScript and CSS files to bootstrap the application. Most of the rendering and logic execution occurs in the client's browser. This pattern provides a fast initial load time, making it suitable for applications with rich interactivity.
Implementation: Create a standard React app using tools like Vite or Next.js without server-side rendering.
Strengths of CSR:
Fast Interactivity: CSR excels in delivering fast and responsive user interfaces. Once the initial page is loaded, subsequent interactions feel instantaneous as the application updates without requiring a full page reload.
Rich User Experience: Interactive features like dynamic content updates are well-suited for CSR. This makes it an excellent choice for applications with a heavy focus on user engagement, such as social media platforms or real-time collaboration tools.
Weaknesses of CSR:
SEO Challenges: One significant drawback of CSR is its potential impact on Search Engine Optimization (SEO). Search engines may have difficulty indexing content rendered on the client side, potentially affecting the discoverability of your application.
Slower Initial Load Time: While CSR provides a swift post-initial load, the first load can be slower, especially on devices with limited processing power or network connections. This can lead to a long FCP and TTI, especially when the site has a large JavaScript bundle.
Server-Side Rendering (SSR)
In SSR, React components are rendered on the server side in response to a user request. The server sends the pre-rendered HTML and any necessary JavaScript to the client, providing a complete page. Once the client receives the HTML, it can hydrate the page, adding interactivity by attaching event listeners and setting up the React application.
Implementation: Use frameworks like Next.js or custom server setups in Node.js to handle SSR logic.
Strengths of SSR:
Improved SEO: One of the significant advantages of SSR is its positive impact on Search Engine Optimization. Search engines can easily crawl and index fully rendered HTML, enhancing your content's discoverability.
Faster Initial Load Time: SSR typically results in faster initial load times than CSR, especially on low-bandwidth or less powerful devices. Users get a fully rendered page from the server, shortening the FCP and TTI.
Weaknesses of SSR:
Reduced Interactivity: While SSR provides a faster initial load, subsequent interactions might not be as snappy as CSR. The client must still download and execute JavaScript to make the application fully interactive.
Increased Server Load: Rendering on the server can lead to increased server load, especially in applications with a high volume of concurrent users. Proper server infrastructure is essential to handle the rendering demands.
How to Choose
CSR: Choose CSR for interactive web apps where fast client-side rendering is critical and initial SEO isn't the primary concern.
SSR: Opt for SSR when SEO is a priority or your application requires fast initial rendering, especially for content-heavy sites.
These rendering patterns are the two most common in React, but there are other patterns like static site generation (SSG), incremental static generation (ISR), etc, all curated to specific use cases. Therefore, choosing the right rendering pattern depends on the specific requirements of your application. Consider factors like SEO, interactivity, initial load times, and the complexity of your application when deciding which pattern to implement.
Conclusion
This guide explored various strategies for optimizing React apps, covering topics from understanding basic web performance metrics and assessing performance to implementing techniques like lazy loading, code splitting, and windowing to optimize performance.
Remember, optimizing React apps is not just a one-time task but an ongoing process. Regularly audit your app, monitor performance metrics, and stay updated with the latest tools and best practices to keep your React applications running smoothly.
References
If you found this article helpful or learned something new, please show your support by liking it and following me for updates on future posts.
You can also connect with me on X, LinkedIn, and GitHub!
Till next time, happy coding!