
JavaScript Design Patterns: Building Efficient and Maintainable Code
Enhancing Code Quality: Exploring JavaScript Design Patterns


Table of contents
Introduction
A common problem we developers encounter while building JavaScript applications is keeping our code clean, organized, and reusable across different projects. Design patterns are useful in this context.
Design patterns can be thought of as established solutions to common programming problems. They use best practices and are reusable across different projects and contexts. Design patterns can offer various benefits, such as:
Code Reusability: Design patterns act as a template for structuring code in a way that makes it modular and reusable in different parts of a project.
Maintainability: Organizing code into patterns makes maintaining and modifying them easier over time.
Scalability: Using design patterns will make your codebase more likely to scale smoothly as your application grows in complexity.
Team Collaboration: Design patterns encourage consistent design choices throughout a project. These patterns also give the codebase a consistent structure and style, making it easier for developers to collaborate.
Efficiency: Design patterns save time by providing templates to follow and also ensure the resulting code is optimal.
This article will explore various JavaScript design patterns and their applications in real-life scenarios.
Prerequisites
Before diving into this tutorial, you need the following prerequisites:
Basic JavaScript: You should know JavaScript fundamentals like variables, functions, conditionals, loops, and data types.
Object-Oriented Programming (OOP): You should understand basic OOP concepts such as classes, objects, inheritance, and encapsulation.
Types of Design Patterns
There are three main categories of design patterns:
Creational design patterns
Structural design patterns
Behavioral design patterns
Each type focuses on specific concerns and includes a set of tailored patterns. Let's go through them!
Creational Design Patterns
Creational design patterns focus on object creation. They ensure we instantiate objects in a manner suitable for the situation. Let's delve into a few critical creational design patterns:
Singleton Pattern
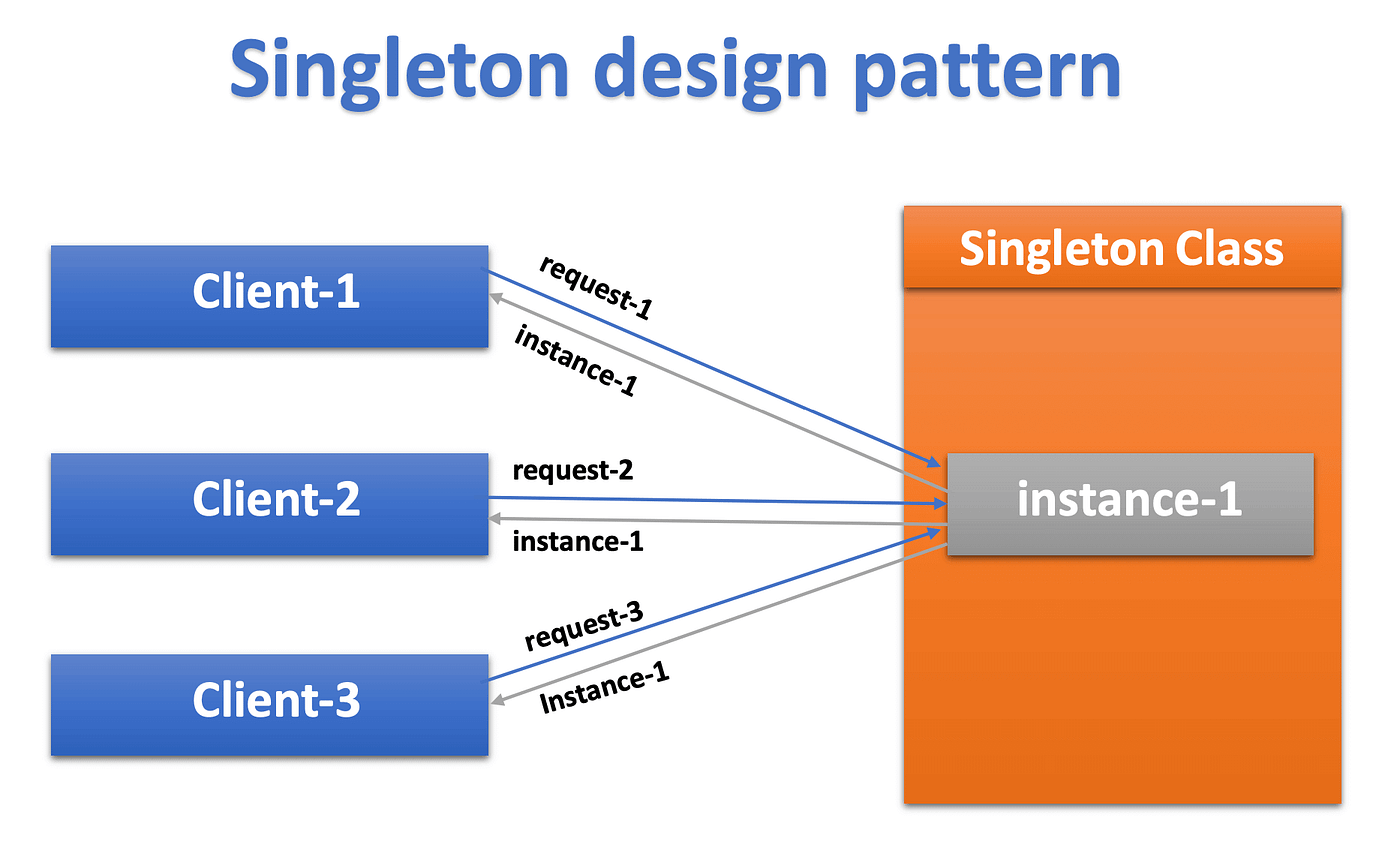
The Singleton pattern ensures that only one class instance exists and provides a global access point to that instance.
This pattern can be useful when managing a resource-intensive object like a database connection. Let's look at an example below:
class DatabaseConnection {
    constructor() {
        // ...
    }
}

// Singleton instance creation function.
DatabaseConnection.getInstance = (function() {
    let instance;
    return function() {
        if (!instance) {
            instance = new DatabaseConnection();
        }
        return instance;
    };
})();

// Get a single instance of DatabaseConnection.
const dbConnection1 = DatabaseConnection.getInstance();
const dbConnection2 = DatabaseConnection.getInstance();
console.log(dbConnection1 === dbConnection2) // Output: true
In this implementation, the DatabaseConnection class has a private static method, getInstance, which controls the instantiation of the class. The first time getInstance is called, it creates a new instance of DatabaseConnection.
Subsequent calls to getInstance returns the existing instance, ensuring that only one instance of DatabaseConnection exists throughout the application.
Factory Pattern
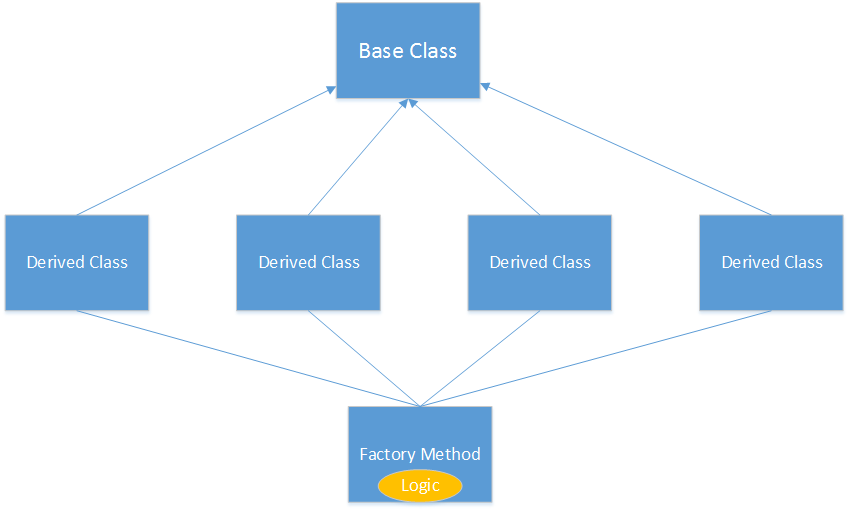
The Factory pattern simplifies object creation by using a single interface to create objects of different types. This pattern helps to reduce the dependence between client code and the objects being created.
Factories are particularly beneficial when creating objects with similar characteristics but differing implementations.
Suppose we're building a game that involves different types of characters. We'll create a factory to generate these characters:
// Define a base Character class with name and type properties
// and an introduce method.
class Character {
    constructor(name, type) {
        this.name = name;
        this.type = type;
    }

    introduce() {
        console.log(`I am ${this.name}, a ${this.type} character.`);
    }
}

// Create specialized Warrior and Mage classes
// that inherit from Character.
class Warrior extends Character {
    constructor(name) {
        super(name, 'Warrior');
    }
}

class Mage extends Character {
    constructor(name) {
        super(name, 'Mage');
    }
}

// Create a CharacterFactory class
// to create Character instances based on type.
class CharacterFactory {
    createCharacter(name, type) {
        switch (type) {
            case 'Warrior':
                return new Warrior(name);
            case 'Mage':
                return new Mage(name);
            default:
                throw new Error('Invalid character type');
        }
    }
}

// Create a factory instance and use it to create characters.
const factory = new CharacterFactory();
const character1 = factory.createCharacter('Aragorn', 'Warrior');
const character2 = factory.createCharacter('Gandalf', 'Mage');

character1.introduce(); // Output: I am Aragorn, a Warrior character.
character2.introduce(); // Output: I am Gandalf, a Mage character.
In this example, the Factory Method pattern encapsulates the logic of creating different character types within the CharacterFactory class. This approach simplifies object creation and separates the client code and the creation process.
Constructor Pattern
The Constructor pattern involves creating objects using a constructor function and the new keyword. This pattern is widely used and forms the basis for creating objects in JavaScript.
Let's look at an example below:
// Creating constructor
function Person(name, age) {
    this.name = name;
    this.age = age;

    // Declaring a method
    this.getAge = function() {
      return `${this.name} is ${this.age} years old`;
    };
}

// Creating new instance
const Alice = new Person('Alice', 30);
console.log(Alice.getAge()); // Alice is 30 years old
These creational design patterns provide a structured approach to object creation. They ensure that we create instances in a controlled manner that suits the specific use case.
Structural Design Patterns
Structural design patterns involve composing objects and classes to create flexible structures. Let's explore a couple of essential structural design patterns:
Adapter Pattern
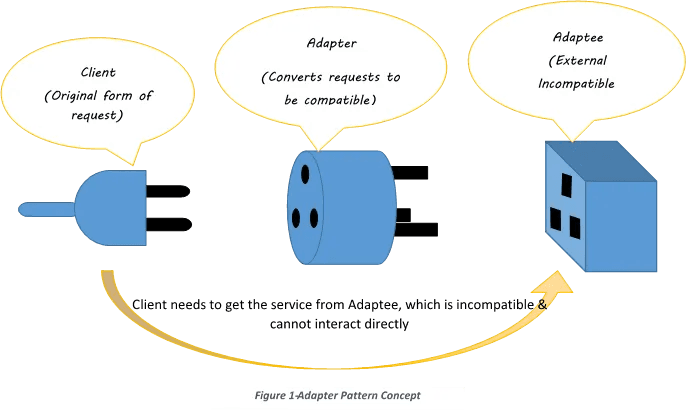
The Adapter pattern serves as a bridge between two interfaces. It allows objects with incompatible interfaces to collaborate.
Imagine you have a legacy API with a different method naming convention. You can create an adapter to make it compatible with your current codebase:
// Create LegacyApi class with an old method.
class LegacyApi {
    requestOldMethod() {
        console.log("This contains the old method")
    }
}

// Create an adapter to bridge between the old and new APIs.
class ModernApiAdapter {
    constructor(legacyApi) {
        this.legacyApi = legacyApi;
    }

    requestNewMethod() {
        this.legacyApi.requestOldMethod();
    }
}

const legacyApi = new LegacyApi();
const adapter = new ModernApiAdapter(legacyApi);
adapter.requestNewMethod(); // Output: This contains old method
In this scenario, the LegacyApi class has a method requestOldMethod. However, you use the ModernApiAdapter class in your modern codebase to make this method compatible with the new code.
The adapter wraps the LegacyApi instance and exposes the requestNewMethod method that internally calls requestOldMethod. This way, you can seamlessly integrate the legacy functionality into your modern codebase without modifying the existing code.
Decorator Pattern
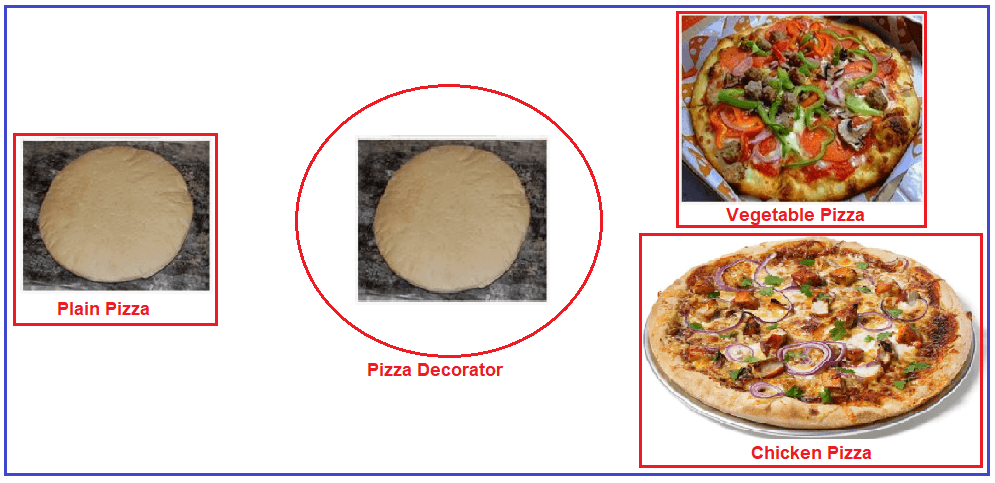
The decorator pattern allows you to dynamically add behavior or responsibilities to objects without modifying their existing code. This pattern is handy when you want to extend the functionality of individual objects without creating a complex subclass hierarchy.
Here's a basic explanation of how it works:
Component Interface: This interface or abstract class defines the methods or properties that the concrete component (the original object) and the decorators (objects that add functionality) must adhere to. You can use a class or object with specific methods in JavaScript as your component interface.
Concrete Component: This is the original object you want to decorate.
Decorators: These are objects that conform to the Component Interface and wrap around the concrete component or other decorators. Decorators enhance or modify the behavior of the components they decorate.
Here's an example in JavaScript:
// Step 1: Define the Component Interface
class Coffee {
  cost() {
    return 5; // Base price for a basic coffee
  }
}

// Step 2: Create a Concrete Component
class SimpleCoffee extends Coffee {}

// Step 3: Create Decorators
class MilkDecorator {
  constructor(coffee) {
    this._coffee = coffee;
  }

  cost() {
    return this._coffee.cost() + 2; // Add the cost of milk
  }
}

class SugarDecorator {
  constructor(coffee) {
    this._coffee = coffee;
  }

  cost() {
    return this._coffee.cost() + 1; // Add the cost of sugar
  }
}

// Usage
const myCoffee = new SimpleCoffee();
console.log("Cost of simple coffee:", myCoffee.cost()); // Output: Cost of simple coffee: 5

const milkCoffee = new MilkDecorator(myCoffee);
console.log("Cost of coffee with milk:", milkCoffee.cost()); // Output: Cost of coffee with milk: 7

const sugarMilkCoffee = new SugarDecorator(milkCoffee);
console.log("Cost of coffee with milk and sugar:", sugarMilkCoffee.cost()); // Output: Cost of coffee with milk and sugar: 8
In this example, Coffee is the Component Interface, SimpleCoffee is the Concrete Component, and MilkDecorator and SugarDecorator are the decorators. You can stack decorators to add or combine functionalities without modifying the original SimpleCoffee class.
Composite Pattern
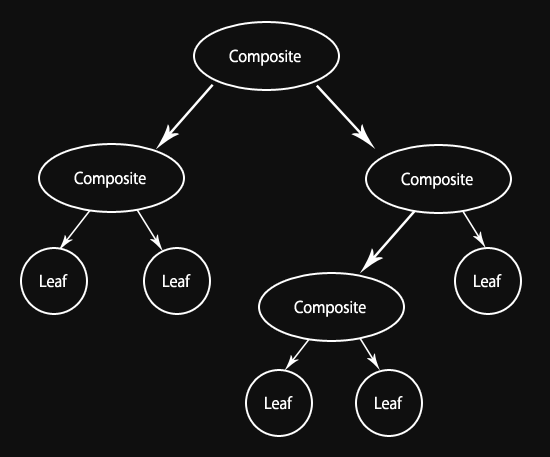
The Composite pattern enables the composition of objects into tree structures that represent part-whole hierarchies. This pattern allows clients to treat individual objects and compositions of objects uniformly.
Let's consider a practical example in the context of a UI framework. You might have a base class called UIComponent that defines the common interface for leaf elements (like buttons or labels) and composite elements (like panels or windows). Composite elements can contain other UIComponent instances, creating a hierarchy.
// Base class
class UIComponent {
    constructor(name) {
        this.name = name;
    }

    render() {
        throw new Error('Not implemented');
    }
}

// Leaf element
class Button extends UIComponent {
    render() {
        console.log(`Rendering Button: ${this.name}`);
    }
}

// Composite element
class Panel extends UIComponent {
    constructor(name) {
        super(name);
        this.children = [];
    }

    addChild(component) {
        this.children.push(component);
    }

    render() {
        console.log(`Rendering Panel: ${this.name}`);
        this.children.forEach(child => child.render());
    }
}

// Creating UI elements
const submitButton = new Button('Submit');
const cancelButton = new Button('Cancel');
const mainPanel = new Panel('Main Panel');
mainPanel.addChild(submitButton);
mainPanel.addChild(cancelButton);

mainPanel.render();

/** Output:
Rendering Panel: Main Panel
Rendering Button: Submit
Rendering Button: Cancel
*/
In this example, the UIComponent acts as the common interface, and both Button and Panel classes inherit from it. The Button class represents a leaf element, while the Panel class is a composite that can contain other components.
When you call the render method on the main panel, it recursively calls the render method on its child components, ensuring the code renders the entire UI structure appropriately.
Behavioral Design Patterns
Behavioral design patterns focus on the interaction between objects, enabling communication and collaboration in an organized manner. Let's go through a few of them:
Observer Pattern
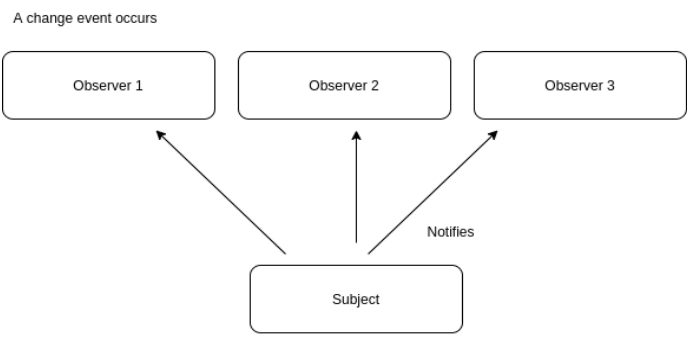
The Observer pattern establishes a one-to-many relationship between objects. When the state of one object (the subject) changes, all its dependents (the observers) are automatically notified and updated. This pattern is beneficial for implementing event-handling systems.
class Subject {
    constructor() {
        this.observers = [];
    }

    addObserver(observer) {
        this.observers.push(observer);
    }

    notify(data) {
        this.observers.forEach(observer => observer.update(data));
    }
}

class Observer {
    constructor(name) {
        this.name = name;
    }

    update(data) {
        console.log(`${this.name} was updated - ${data}`);
    }
}

const subject = new Subject();
const observer1 = new Observer("First Observer");
const observer2 = new Observer("Second Observer");

subject.addObserver(observer1);
subject.addObserver(observer2);

subject.notify("notification"); // Notifies both observers
// Output: First Observer was updated - notification
// Output: Second Observer was updated - notification
In this scenario, the Subject class keeps track of a list of observers and offers methods to add new observers and notify them of any changes. The Observer class defines the update method, which the notify method invokes when the subject's state changes.
Strategy Pattern

The Strategy pattern allows you to define and choose from a family of interchangeable algorithms. It promotes separation of concerns and flexibility in selecting implementations for solving a particular problem.
Here's how you can implement the Strategy Pattern in JavaScript:
Define the Context: The context is an object that references the selected strategy and provides a method for clients to set or change the strategy.
Define the Strategies: These are classes or functions containing various algorithms. Each strategy should implement a common interface or have a consistent method signature.
Use the Strategies: The client code can use the context to select and execute a specific strategy.
Let's say you're building a payment processing system. You could implement the different payment methods (credit card, PayPal, etc.) as strategies:
// Step 1: Define the Context
class PaymentContext {
  constructor(strategy) {
    this.strategy = strategy;
  }

  setPaymentStrategy(strategy) {
    this.strategy = strategy;
  }

  executePayment(amount) {
    return this.strategy.pay(amount);
  }
}

// Step 2: Define Strategies
class CreditCardPayment {
  pay(amount) {
    console.log(`Paid ${amount} using credit card.`);
    // Actual payment logic for credit card goes here
  }
}

class PayPalPayment {
  pay(amount) {
    console.log(`Paid ${amount} using PayPal.`);
    // Actual payment logic for PayPal goes here
  }
}

class BankTransferPayment {
  pay(amount) {
    console.log(`Paid ${amount} using bank transfer.`);
    // Actual payment logic for bank transfer goes here
  }
}

// Step 3: Use the Strategies
const paymentContext = new PaymentContext(new CreditCardPayment());

paymentContext.executePayment(100); // Output: Paid 100 using credit card.

// Change the payment method dynamically
paymentContext.setPaymentStrategy(new PayPalPayment());
paymentContext.executePayment(50); // Output: Paid 50 using PayPal.

// Change the payment method again
paymentContext.setPaymentStrategy(new BankTransferPayment());
paymentContext.executePayment(200); // Output: Paid 200 using bank transfer.
In this example:
PaymentContextis the context that references the current payment strategy and provides methods to set and execute the strategy.CreditCardPayment,PayPalPayment, andBankTransferPaymentare concrete strategies, each implementing apaymethod representing a specific payment algorithm.The client code can create a
PaymentContextinstance and set the initial payment strategy. It can also dynamically change the strategy at runtime usingsetPaymentStrategy.The
executePaymentmethod ofPaymentContextdelegates the payment logic to the selected strategy.
These are just a few examples of JavaScript's creational, structural, and behavioral design patterns. Each pattern addresses specific challenges and can be applied in various contexts.
Choosing the Right Pattern
When selecting a design pattern for a given situation, several factors should guide your choice:
Understanding the Problem: Begin by thoroughly understanding the problem you're trying to solve. Different patterns address different issues, so clarifying the problem's nature helps narrow your options.
Project Requirements: Consider the requirements of your project. Specific patterns might be more suitable if scalability, extensibility, or maintainability are critical. For instance, creational patterns can help manage object creation in complex applications.
Pattern Applicability: Ensure the chosen pattern fits the context. Some patterns are better suited for specific scenarios. For example, the Observer pattern is ideal for implementing event-driven architectures.
Future Considerations: Consider how the pattern will impact future changes or additions to your code. A pattern that offers flexibility can make adapting to future requirements more straightforward.
When choosing a design pattern for your JavaScript application, it's essential to consider these factors to ensure that it meets the project's requirements and provides a solid foundation.
Conclusion
Design patterns are powerful tools that can significantly enhance your JavaScript development process. By understanding how they work and their appropriate use cases, you can make informed decisions about when and how to apply them to build efficient, scalable, and maintainable codebases.
If you found this article helpful or learned something new, please show your support by liking it and following me for updates on future posts.
You can also connect with me on Twitter, LinkedIn, and GitHub!
Till next time, happy coding!